

6 Step DIY AC Compressor Clutch Diagnostic With Safety Red Lines
Most of the time, an AC compressor clutch that will not engage points to common causes such as low refrigerant triggering a pressure cutoff, a blown fuse or failed relay, a wiring or ground fault, or a stuck mechanical clutch with too much air gap. Start by looking at the pulley with the engine running and the AC on, then check the AC fuse and relay before touching anything else.
TL;DR:
- A weak or failed relay, blown fuse, or wiring fault often causes the compressor clutch not to engage, especially if the pulley spins but the clutch plate does not move.
- Low refrigerant levels or a malfunctioning pressure switch can prevent clutch engagement, as the system cuts power to protect the compressor when pressure is too low.
- Mechanical issues like excessive air gap, worn friction faces, or a stuck pulley are common clutch failures even if electrical checks appear normal.
- Testing the clutch circuit involves verifying voltage and current at the relay, coil, and harness to distinguish electrical faults from mechanical problems.
- Complex repair tasks such as refrigerant recharging, leak detection, or compressor replacement require certified technicians with EPA-approved equipment.
Table of Contents
- Quick diagnostic checklist you can run safely
- How to test the compressor clutch circuit and read the results
- Why low refrigerant or a bad pressure switch blocks engagement
- Mechanical clutch problems: air gap, sticking, and when to replace
- When to stop troubleshooting yourself and call a shop
- What experience with AC systems tells us about clutch failures
- Get a certified diagnosis for your AC compressor clutch
- FAQ
- Sources
Quick diagnostic checklist you can run safely
Before pulling gauges or meters, a few minutes of visual and electrical checks will usually tell you which system is at fault.
- With the engine running and AC set to max, watch the compressor pulley: if the outer pulley spins, but the center plate does not, the clutch itself is not engaging.
- Confirm the AC is actually being requested: check that the blower is on and the control head is set to a cooling mode, not just fan.
- Pop the hood and check the AC fuse in the fuse box; a blown fuse should always be replaced with one of the same amperage rating.
- Locate the AC compressor relay and listen or feel for a click when the AC is requested; swap it with an identical relay from another circuit if you are unsure.
- If you have access to a scan tool with bidirectional controls, try commanding the clutch to engage directly and watch for a response.
- Stop and call a shop if you smell refrigerant, see oily residue near fittings, or cannot safely verify pressures and voltages yourself.
For a broader rundown of compressor-related symptoms, our compressor symptoms checklist covers failure signs beyond the clutch itself.
How to test the compressor clutch circuit and read the results
Most compressor clutch circuits run a constant 12-volt feed to the relay, which then switches a ground or power path to the clutch coil when the AC system and pressure switches allow it. Testing in order, from power supply to coil, narrows the fault fast.
- Check battery voltage at the relay’s power terminal with the key on; a reading near battery voltage confirms the feed side is fine.
- Request AC and check for voltage at the relay’s output terminal and at the clutch coil connector; no voltage here with power present upstream usually means a bad relay or an open ECM-controlled ground.
- Swap the relay only with one of identical part number and rating; a mismatched relay can draw or switch current incorrectly and mask the real fault.
- Measure current draw at the clutch coil with a low-amp clamp or a DVOM in series while AC is commanded on, since a stepwise electrical check like this is how shops separate relay, wiring, and coil problems from mechanical ones.
- Run a voltage-drop test across the harness connectors near the compressor, because restricted or corroded connections reduce both voltage and amperage and can mimic a dead coil.
No voltage anywhere past the relay usually means a wiring or ground fault; voltage present but no current draw often means an open clutch coil; normal current with no mechanical movement points away from electrical and toward the clutch assembly itself.
Pro Tip: Test with a fused jumper wire rather than a direct battery jumper when confirming coil function, since an unfused bypass can damage the coil or wiring if something downstream is shorted.
Why low refrigerant or a bad pressure switch blocks engagement
Compressor clutches are wired through a low-pressure cutoff switch that protects the compressor from running without enough refrigerant and oil to lubricate it. When low-side pressure drops below the switch’s threshold, the circuit opens and the clutch simply will not engage, even if every wire and relay is healthy.
- A shop confirms this with manifold gauges and a refrigerant identifier, which distinguishes a genuinely low charge from a failed or miscalibrated pressure switch.
- Adding refrigerant without finding and fixing a leak is a short-term patch that can let the system run low again and stress the compressor.
- Topping off a system also risks mixing refrigerant types if the original charge is unknown, which complicates future service.
Refrigerant work is regulated for a reason: under EPA Section 609, anyone servicing a motor vehicle AC system for pay must be certified and must use approved recovery equipment, and venting refrigerant to the atmosphere is prohibited. If you suspect a leak or see visible oil residue at fittings, that is a sign for a certified shop, not a DIY recharge. Our refrigerant leak symptoms guide covers what those warning signs look like in practice.
Mechanical clutch problems: air gap, sticking, and when to replace
A clutch that gets full voltage and current but still will not pull in is usually a mechanical problem, not an electrical one. Glazed or scored friction faces, a pulley that has started to separate from its bearing, or an air gap that has grown too wide will all stop the magnetic coil from pulling the plate into contact.
- Inspect the clutch face and pulley visually for scoring, glazing, or any sign the pulley bearing is loose or wobbling.
- Measure the air gap between the clutch plate and pulley face with a feeler gauge, comparing the reading to your vehicle’s service manual specification.
- If the clutch seems stuck rather than worn, a gentle tap near the hub combined with a brief, fused-jumper engagement test can sometimes free it.
- Avoid repeatedly forcing engagement attempts, since short, controlled engagement cycles protect the compressor, while repeated forced attempts on a stuck clutch can overheat and burn out the coil.
- Treat scored faces, excessive air gap that cannot be adjusted back into spec, or a separated pulley as signs that the clutch assembly, or the whole compressor, needs replacement.
Pro Tip: If the compressor has any visible metal shavings in the clutch area, have the system inspected before running it further, since that often signals internal compressor wear that a new clutch alone will not fix.
When to stop troubleshooting yourself and call a shop
Some steps cross from DIY-friendly into work that requires certified equipment and training. Refrigerant recovery, recharging, leak repair, and compressor or clutch replacement that requires evacuating the system all fall into that category, along with intermittent electrical faults that resist simple testing and anything tied to ECM-level diagnostics.
A shop visit typically includes:
- Certified refrigerant recovery and leak detection using dye or electronic sniffers.
- Manifold pressure testing on both the high and low sides to confirm charge level and switch behavior.
- Electrical current, voltage, and voltage-drop testing at the clutch coil and connectors.
- Scan-tool bidirectional tests to command the clutch and confirm ECM output.
- Replacement of the clutch coil, clutch assembly, or full compressor as needed.
Cost depends mainly on refrigerant type and quantity, labor for leak repair versus straight clutch replacement, and parts quality. Shops performing this work must hold EPA Section 609 certification and use approved recovery equipment, with service records kept as required. Our AC leak repair cost guide breaks down what typically drives the bill.
What experience with AC systems tells us about clutch failures
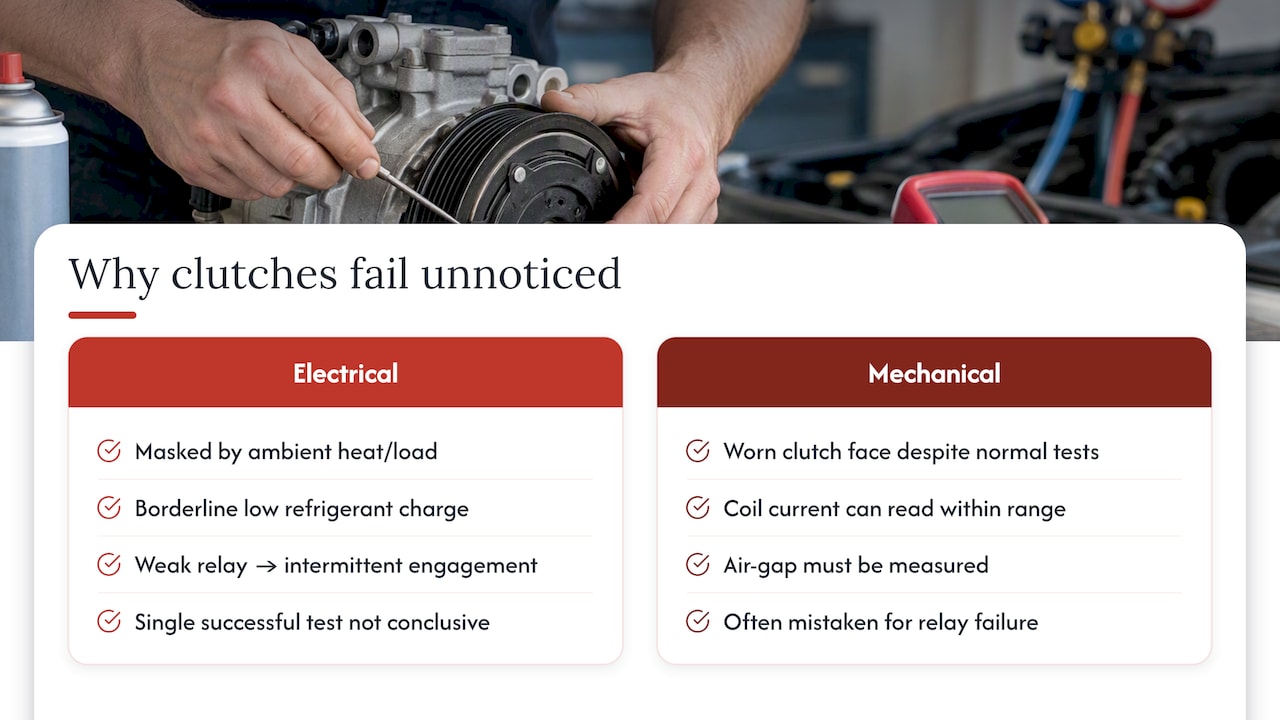
The conventional advice to “just check the fuse first” undersells how often ambient temperature and system load mask the real problem. A borderline low charge or a weak relay can engage the clutch fine on a cool morning and fail completely once the car sits in afternoon heat with the compressor under load, which is why a single successful test does not rule out an intermittent fault.
The other thing DIYers underestimate is how much mechanical wear hides behind a normal-looking electrical test. Current draw within range tells you the coil works, not that the clutch will physically engage, and skipping the air gap check because the wiring “passed” leads a lot of people to replace a relay twice before finding a worn clutch face.
— Shingi
Get a certified diagnosis for your AC compressor clutch

We handle AC compressor clutch diagnosis the same way described above, just with manifold gauges, low-amp current testing, and EPA-certified refrigerant recovery equipment on hand. Technicians have serviced vehicles for many years, and repairs typically carry a warranty.
- Diagnostics cover electrical, pressure, and mechanical clutch checks in one visit.
- We handle leak repair and certified refrigerant recovery, not just a recharge.
- Compressor and clutch assembly replacement is available when repair is not realistic.
Book AC repair online or by phone, and plan to describe when the clutch stopped engaging and under what conditions, since that detail speeds up diagnosis at drop-off.
FAQ
How to force an AC compressor clutch to engage?
You can briefly bridge power to the clutch coil with a properly fused jumper wire to confirm the coil itself works, but this is a diagnostic test, not a repair. If the clutch engages this way but not through normal operation, the fault is in the relay, wiring, or pressure switch feeding that circuit.
How do I know if my AC compressor clutch is going bad?
Watch for the outer pulley spinning while the center plate stays still, inconsistent cooling that comes and goes, or a clicking or chattering noise near the compressor. A stepwise electrical and mechanical check that includes air gap measurement will confirm whether the clutch itself is failing.
How to confirm compressor clutch is engaged?
Look directly at the pulley with the AC on: the center plate should be turning at the same speed as the outer pulley, with no visible slip or wobble. You can also feel for a slight vibration or click at the moment the AC is switched on, which signals the clutch pulling in.
How to unstick an AC compressor clutch?
A gentle tap near the hub while briefly energizing the coil through a fused jumper can sometimes free a clutch that is sticking rather than failing outright. Repeated forced engagement attempts risk overheating the coil, so if tapping and a brief test do not free it, treat it as a sign the clutch or compressor needs professional inspection.
Why is my AC compressor clutch not engaging in hot weather?
Higher ambient heat increases system pressure and load, which can push a borderline low refrigerant charge or a weak relay past the point where the clutch will engage. A system that works fine on a cool day but fails in heat often has a marginal charge, pressure switch, or electrical connection that full testing will reveal.
Sources
- Troubleshooting a “No A/C Compressor Engagement” Fault — ShopPress / Dorman
- Diagnosing Voltage Drops: Electrical Automotive Troubleshooting — Fluke
- Regulatory requirements for MVAC system servicing — EPA
- A novel approach to enhance compressor life — SAE (2025)
Recommended
- Car Owners: 6 Safe Checks for AC Compressor Symptoms Before Replacement
- Car AC System Checklist: A Quick Diagnostic Guide
- Car Owners: 5 AC Refrigerant Leak Symptoms That Require a Shop Visit
- What Is an AC Compressor? A Car Owner’s Guide
Leave a Reply