
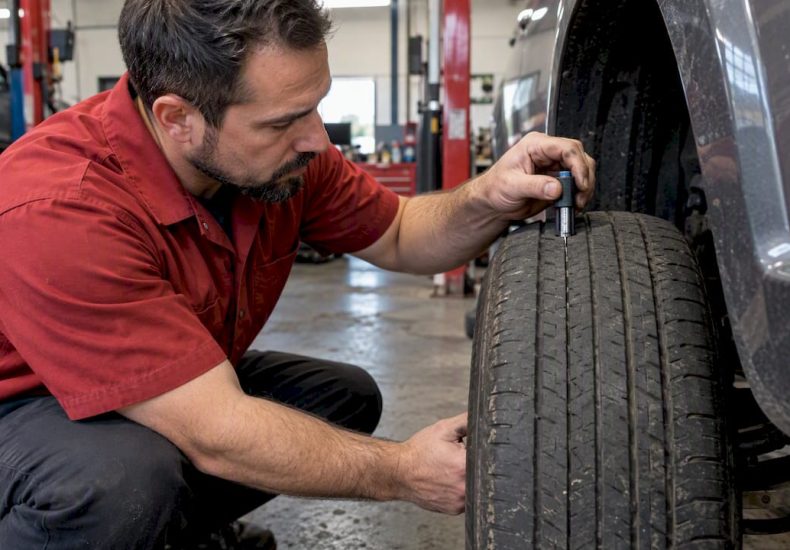
Tread Patterns That Reveal Uneven Tire Wear, 2/32 Inch Rule for Drivers
Uneven tire wear almost always points to a mechanical issue, most commonly incorrect inflation, misalignment, imbalance, or worn suspension parts. Check cold tire pressure against the vehicle placard, then inspect the full tread width for one-sided wear or cupping. Tread at or below 2/32 inch, or any sign of exposed cord, means the tire needs replacing and the underlying cause needs a professional look before a new tire goes on.
TL;DR:
- Center wear signals overinflation, shoulder wear points to underinflation or alignment trouble, feathering suggests incorrect toe, and cupping indicates imbalance or worn suspension.
- Check tire pressure monthly against the vehicle placard, and rotate tires per the owner’s manual or roughly every 5,000 miles when no interval is specified.
- Replace any tire at 2/32 inch of tread or with exposed cord, then have a professional identify the cause before fitting a replacement.
- Severe vibration, a sidewall bulge, or exposed cords call for immediate evaluation by a qualified technician, not a wait and see approach.
- When one tire wears far faster than its neighbors, check for a dragging brake caliper before alignment, which cannot fix a brake fault.
Table of Contents
- Common tire wear patterns and what they typically indicate
- Why pressure, alignment, balance, and driving habits create these patterns
- How to inspect your tires and when to book a repair
- A maintenance checklist that prevents uneven wear before it starts
- Why a professional inspection catches what you can’t see at home
- Can a sticking brake caliper cause uneven tire wear?
- Can a manufacturing defect in the tire itself cause uneven wear?
- What the tread pattern actually tells you
- FAQ
- Sources
Common tire wear patterns and what they typically indicate
The shape of the wear tells you almost everything about the cause before a technician even touches the car.
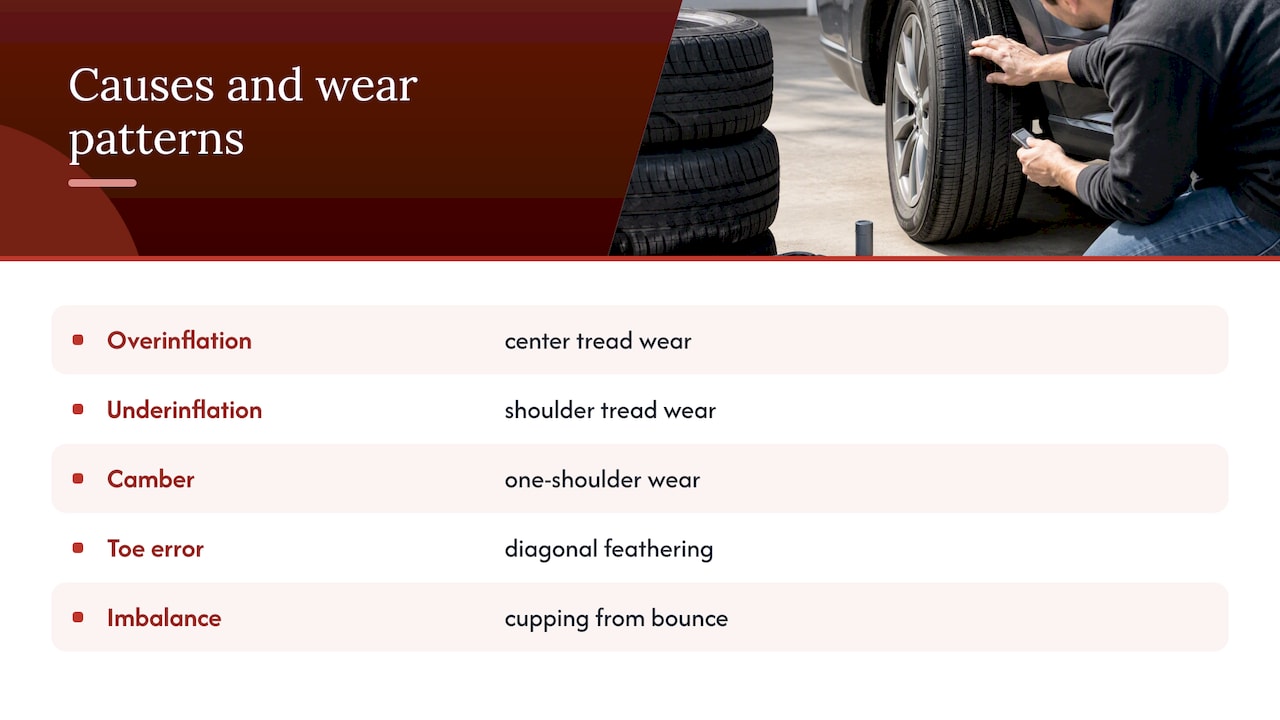
- Center wear: chronic overinflation flattens the tread so the middle of the tire carries most of the load. NHTSA advises checking pressure against the vehicle manufacturer’s placard, not the number molded into the tire sidewall, since the sidewall figure is a maximum, not a target.
- Both shoulders worn: this usually means chronic underinflation or an overloaded vehicle, since a soft tire bulges at the edges and wears them faster than the center.
- Inner or outer shoulder wear: this points to a camber or toe problem. According to Bridgestone, one-sided shoulder wear is commonly associated with excessive positive or negative camber, and drivers often notice the car pulling or the steering wheel sitting slightly off-center.
- Feathering, sometimes called heel-toe wear: running a hand across the tread reveals a sharp edge on one side of each tread block and a rounded edge on the other. Bridgestone ties this pattern specifically to incorrect toe alignment.
- Cupping or scalloping: dips spaced a few inches apart across the tread usually mean imbalance, worn shocks or struts, or loose suspension components. Goodyear notes that cupping often comes with vibration at certain speeds and that the scallops typically run three to four inches across.
- Flat spots: a single flattened area can come from a hard, locked-wheel stop, or from a vehicle sitting in one position for weeks without moving. The first is usually permanent; the second sometimes improves after a few miles of driving.
- Patchy or diagonal wear: irregular patches scattered around the tire often trace back to a missed rotation schedule, a damaged wheel, or a tire that was carrying an uneven load for an extended period.
Reading the pattern correctly saves a repeat trip, because replacing a tire without fixing what caused the wear just sets up the new tire to fail the same way.
Why pressure, alignment, balance, and driving habits create these patterns
Every wear pattern traces back to physics at the contact patch, the small area of rubber actually touching the road.
Overinflation bows the tread outward, shrinking that contact patch down to a strip in the middle of the tire, which is why center wear shows up. Underinflation does the opposite: the tread sags at the edges, pressing the shoulders into the road harder than the center. This is exactly why NHTSA’s guidance centers on the placard pressure rather than the sidewall maximum: the placard reflects the vehicle’s actual weight distribution and handling design, while the sidewall number is just the ceiling the tire can structurally handle.
Alignment angles work on the same contact patch from a different direction. Camber tilts the tire vertically, so excess camber in either direction presses one shoulder into the road more than the other. Toe affects which way the tires point relative to each other, and a toe error drags the tread sideways with every rotation, shaving it into the diagonal feathered pattern described above. Worn steering or suspension components, like tie rod ends or control arm bushings, can shift these angles over time even on a car that was aligned correctly when new.
Balance and wheel condition affect a different kind of contact: consistency. An imbalanced tire or a bent rim bounces slightly with every rotation instead of sitting flat, and that repeated loss and recovery of contact is what carves cupping into the tread. Worn shocks or struts make this worse, since their job is to keep the tire pressed evenly against the road as the suspension moves. When damping fails, the tire hops rather than tracks, and Goodyear’s cupping guidance treats this as a system problem rather than a tire defect.
Driving inputs and load add a final layer. Hard braking, aggressive cornering, and overloading a vehicle all concentrate stress on specific parts of the tread faster than normal driving would. Before adjusting alignment angles, a technician should confirm pressures, inspect the tire and wheel for damage, and check suspension components, since aligning a car with a bad shock or a bent rim only masks a problem that will reappear.
How to inspect your tires and when to book a repair
A simple monthly habit catches most problems before they become expensive. Check cold pressure against the vehicle placard, then run your palm across the full width of each tread, feeling for the sharp-to-rounded edge of feathering or the dip-and-rise rhythm of cupping. Look for bulges, cracks, or anything embedded in the rubber while you’re at it.
Replace a tire once any point around the tread hits 2/32 inch (1.6 mm) or shows exposed cord, a threshold both Bridgestone and NHTSA treat as a hard limit rather than a suggestion. A computerized alignment corrects camber and toe, dynamic balancing on a spin balancer corrects vibration-causing imbalance, and replacing worn shocks or struts restores uniform damping, but none of these procedures brings back tread that’s already gone; they only stop the pattern from continuing on the next set of tires.
Severe vibration, exposed cords, or a visible bulge in the sidewall are red flags that call for an immediate professional evaluation rather than a wait-and-see approach. Our car safety inspection checklist walks through what to look for between shop visits.
A maintenance checklist that prevents uneven wear before it starts
Most uneven wear is preventable with a few habits repeated consistently rather than one big fix.
- Check cold pressure monthly on all four tires plus the spare, using the vehicle placard figure rather than the sidewall maximum.
- Rotate tires per the owner’s manual, or roughly every 5,000 miles if the manual doesn’t specify, and recheck pressures afterward since front and rear specs often differ.
- Inspect tires after hitting a pothole or curb, and have balance or alignment checked promptly if you feel new vibration or pulling.
- Keep the vehicle’s load within its rated limits and ease up on hard launches, aggressive cornering, and sudden braking when you can.
- Keep a simple log of pressures and rotation dates so a developing trend, like one tire losing pressure faster than the others, shows up early.
Pro Tip: Write the date and mileage on a sticky note inside the glove box after every rotation; it takes ten seconds and prevents the most common missed-maintenance mistake.
A worn shock often announces itself through noise before it shows up in the tread. Our guide to diagnosing suspension noise covers what to listen for.
Why a professional inspection catches what you can’t see at home
Our technicians use computerized alignment and dynamic balancing equipment that catches angle and imbalance issues a home inspection simply can’t measure. A digital vehicle inspection with photos documents shock and strut condition alongside tread wear, backed by a warranty on the repair. Home checks handle pressure and visual inspection; anything involving angles, balance, or suspension components belongs in a shop.
Can a sticking brake caliper cause uneven tire wear?
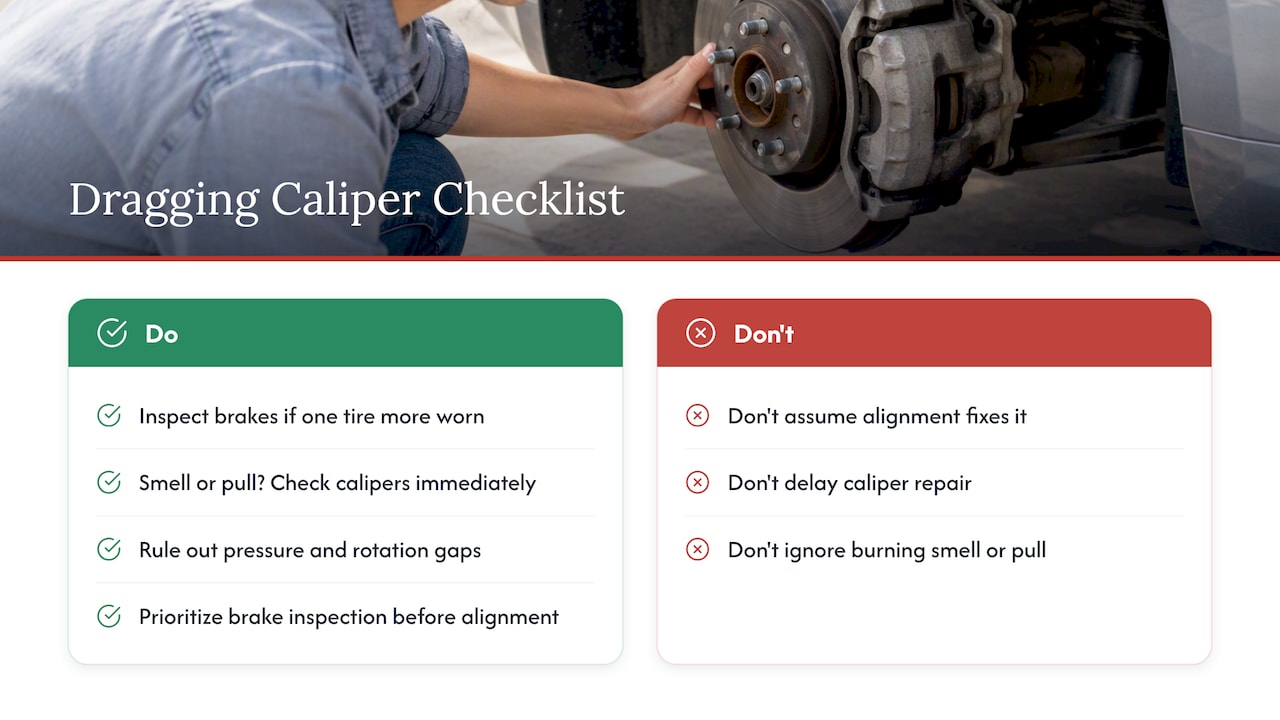
Yes. A caliper that doesn’t release fully keeps one brake pad dragging against the rotor even when you’re off the pedal, which heats that corner’s tire and wears it faster than the other three. This usually shows up as wear concentrated on a single tire rather than a pattern spread symmetrically across an axle, and it often comes with a faint burning smell or a pull toward the dragging side.
A dragging caliper also throws off how much weight that corner’s suspension handles under braking, which can accelerate cupping on top of the heat damage. Drivers sometimes mistake this for an alignment problem because of the pulling sensation, but alignment work won’t fix a mechanical brake issue underneath it. If one tire looks noticeably more worn than the others and you’ve ruled out pressure and rotation gaps, a brake inspection should come before an alignment appointment. Our brake repair service addresses sticking calipers and the uneven heat and wear they cause.
Catching a dragging caliper early also protects the rotor, since prolonged dragging can warp it and create a pulsation under braking that feels similar to a wheel balance issue. Separating these causes is exactly the kind of diagnostic work a shop visit is built for.
Can a manufacturing defect in the tire itself cause uneven wear?
Occasionally, yes, though it’s far less common than inflation, alignment, or suspension causes. A defect typically shows up as a localized bulge, an out-of-round tire that never balances correctly no matter how many times it’s spun on the machine, or a wear pattern confined to a single tire with no corresponding issue in the suspension or alignment on that corner.
The distinguishing clue is isolation: a mechanical cause like camber or toe usually affects a matched pair of tires on the same axle in a similar way, while a defect tends to affect just one tire regardless of what the other three are doing. A tire that won’t hold balance after repeated attempts, or one with a visible lump or sidewall distortion, is worth bringing back to the retailer or manufacturer for evaluation, since many carry warranties against manufacturing defects. Ruling out pressure, alignment, and balance first keeps you from chasing a defect that isn’t actually there, and it’s the same sequence a shop follows before signing off on a warranty claim.
What the tread pattern actually tells you
The most useful thing to understand about uneven tire wear is that the pattern is a diagnosis, not a complaint. Center wear, shoulder wear, feathering, and cupping each point to a specific mechanical cause with enough consistency that you can often name the likely problem before a technician lifts the car. The conventional advice to “just replace the tires and see if it happens again” skips the one step that actually matters: finding out why it happened the first time.
What gets underestimated is how often the fix is cheap and preventive, a pressure check, a rotation, a quick look after hitting a pothole, rather than expensive. What gets overestimated is how much a new tire alone solves. Without correcting pressure, alignment, or a worn shock, the replacement wears the same way the original did. Prioritize the diagnosis over the replacement, and the tires you already own will likely last longer than you expect.
— Shingi
FAQ
What does uneven tire wear usually indicate?
Uneven tire wear usually indicates a specific mechanical issue tied to the pattern you see: center wear points to overinflation, shoulder wear to underinflation or alignment angles, and cupping to imbalance or worn suspension parts. The NHTSA tire guidance recommends checking pressure against the vehicle placard as the first diagnostic step.
What is the 3% rule for tires?
This phrase isn’t a standard industry term, and we don’t have a sourced definition to confirm what it refers to in tire maintenance. If you’ve seen it elsewhere, it’s worth checking the original context, since it may relate to a specific manufacturer’s rotation or pressure guidance rather than a universal rule.
How long should a front tire last?
Tire lifespan depends heavily on pressure maintenance, alignment, driving habits, and rotation schedule rather than a fixed number of miles, so there’s no single reliable figure to quote. What matters more than an age target is the tread depth: once any point on the tire reaches 2/32 inch (1.6 mm) or shows exposed cord, it’s time to replace it regardless of how long it’s been in service.
How to extend tire life?
Check cold pressure monthly against the vehicle placard, rotate tires on schedule (roughly every 5,000 miles if your manual doesn’t specify), and inspect for damage after hitting a pothole or curb. Keeping the vehicle within its load limits and having vibration or pulling diagnosed promptly, rather than ignored, prevents the small issues that turn into expensive wear patterns.
Sources
Recommended
- High Mileage Vehicle Maintenance Tips That Work
- How to Inspect Brake Pads at Home: A Safe Guide
- Brake Pads vs Brake Shoes: What Drivers Need to Know
Leave a Reply